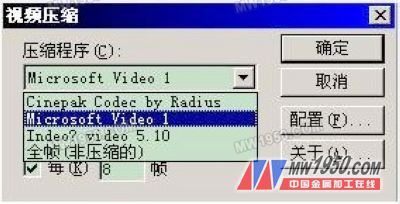
Finally, I will talk about how to render a good animation into an image file, so that any viewer can use the normal playback software to receive good animation without installing SolidWorks. Click the Record Animation button in the animator toolbar to enter the Record Animation dialog box. Name your animation first, save as microsoft AVI file. Select the photoworks buffer in the image renderer bar so that the animator will use the textures, lights, and backgrounds that the photoworks set for the assembly when rendering the animation. The screen size can be arbitrarily chosen, but the higher the resolution is rendered, the slower it is, generally 800X600. The number of animations per second defaults to 7.5. This speed produces a poor effect. The number of frames on the TV is around 25-30 frames. This is the best effect. It is too high and meaningless. In my personal experience, 15 frames should be used. It is a bottom line. Click Save and a video compression dialog will pop up to compress the animation using the compression program installed on your computer. In the compression program drop-down box, you can see the existing compression program of this machine. Here, microsoft video 1 is used for compression. The number of frames per (K) is changed to the same as the number of animation frames. Other options use the default value. Generally do not use full frame (non-compressed), which will take up a lot of hard disk space, I have tried this way, the result of a 15-second animation takes up 800M space. In addition, if you have a divx mpeg4 decoder installed on your computer, you can compress it in this way. Compared to microsoft video 1, the same quality animation takes up less space. Ok, after some hard work and a long wait, the animation is finished, let's open it.
Finally, you need to explain: Before recording the animation, first press the "First Animation" button, so that you can first render the first frame of the animation, instead of first rendering the current frame and then start rendering from scratch.
The above is the basic method of making animations using animator, and a few points are explained here:
Animator is not 3dsmax, its animation function is simple but not particularly powerful. When animating a part, all path points must be set at one time, otherwise the animator will cover when you set the path point for the part for the second time. The series of path points you set for the first time.
Don't animate two interconnected parts separately, so strange errors can occur and sometimes the assembly will fall apart.
Before you render the animation, if you set the delay time, be sure to click the "First Animation" button, otherwise the rendered animation will start at the current position of the still image, and the real animation will not start until the delay time has elapsed.
Previous page
Bullion Fringe,Curtain Bullion Trimming,Golden Curtain Bullion Trimming
Taojin Textile Co., Ltd. , http://www.hzcurtain-accessory.com